Developing techniques to capture news websites programmatically.
Capturing the content of news websites
PUBLISHED: 24 Apr 2017Project: News on websites
I decided I wanted to try to do a piece of research which looked at how different organisations, online newspapers, approached updating their website content.
My starting point was a set of related questions, along these lines: How do leading newspaper websites present ‘the news’ to their readers? How do strategies for news presentation vary? What are the differences between ‘western’ media and the media in Japan?
I was also interested in developing practical ways to record the content of news websites, this is not as easy as it might seem.
Choosing websites
My choice was influenced by two separate factors.
- A. The ‘capturability’ of the site
Not all newspaper websites are constructed in the same way, and indeed a good many of them are exceedingly complex as they draw in and present a great variety of content, which often includes various forms (video, gifs, images) of advertising supplied by an outside party such as Google.
As a result, websites can look very different when you try to capture them. I chose websites which, when converted via the capture process into a still representation, turned out pretty much like the ‘live’ website.
- B. Quality of content
I decided to go with newspapers that can reasonable be thought of as representing ‘quality’ journalism in their respective markets. These are (I’m fairly certain) not the most popular sources for news, but they all have an important and respected position in the journalistic tradition, and the ‘national conversation’, of their respective countries.
The (entirely unsurprising) resulting choices were -
- USA: New York Times
- UK: the Guardian
- Japan: Asahi Shimbun
As you will see, these choices are also useful in another more subtle way, more about that in ‘Scheduling Captures’ below.
Practicalities
I normally work on a Mac so most of the stuff I explain here - while it should be adaptable to a Windows environment - assumes a Unix-y style environment, having said that this project is currently reliant on a piece of Windows software (ZCron).
The initial problem was how to capture the whole of a news website accurately and programmatically. The capture process has to be automated so after various attempts to use browser plugins (e.g. Chrome’s ‘Awesome Screenshot’ etc) with some sort of keystroke/UI automation (using the very wonderful Hammerspoon) I eventually stumbled up what seems to be a great tool for doing exactly what I want…
Phantom.js
I started off by pinching another (more programming-talented) user’s script as I couldn’t work out how to capture more than one site and get accurate and reliable capture times in my filenames, a/synchronous stuff and javascript, yeuch…
I ended up adding a little subroutine to name and date files in a more useful way.
Here’s the script I am using, it’s adapted slightly (with a great deal of thanks to the author!) from the original render_multi_urls.js on the Phantom.js examples github repository.
// Render Multiple URLs to file

"use strict";
var RenderUrlsToFile, arrayOfUrls, system;

system = require("system");

/*
Render given urls
@param array of URLs to render
@param callbackPerUrl Function called after finishing each URL, including the last URL
@param callbackFinal Function called after finishing everything
*/

RenderUrlsToFile = function(urls, callbackPerUrl, callbackFinal) {
    var getFilename, next, page, retrieve, urlIndex, webpage, t;
    urlIndex = 0;
    webpage = require("webpage");
    page = null;
    t = timestamp();//added by spkb <!--1413_24–01-->
    getFilename = function() {
        return "RM=" + t + "__" + urlIndex + ".png";
    };
    next = function(status, url, file) {
        page.close();
        callbackPerUrl(status, url, file);
        return retrieve();
    };
    retrieve = function() {
        var url;
        if (urls.length > 0) {
            url = urls.shift();
            urlIndex++;
            page = webpage.create();
            page.viewportSize = { width: 1024, height: 768 };
            page.settings.userAgent = "Phantom.js bot";
            return page.open("http://" + url, function(status) {
                var file;
                file = getFilename();
                if (status === "success") {
                    return window.setTimeout((function() {
                        page.render(file);
                        return next(status, url, file);
                    }), 200);
                } else {
                    return next(status, url, file);
                }
            });
        } else {
            return callbackFinal();
        }
    };
    return retrieve();
};

arrayOfUrls = null;

if (system.args.length > 1) {
    arrayOfUrls = Array.prototype.slice.call(system.args, 1);
} else {
    console.log("Usage: phantomjs render_multi_url.js [domain.name1, domain.name2, ...]");
    arrayOfUrls = [
        'www.asahi.com/',
        'www.nytimes.com/',
        'www.theguardian.com/uk/'];
}

RenderUrlsToFile(arrayOfUrls, (function(status, url, file) {
    if (status !== "success") {
        return console.log("Unable to render '" + url + "'");
    } else {
        return console.log("Rendered '" + url + "' at '" + file + "'");
    }
}), function() {
    return phantom.exit();
});

// added to assist with naming generated files //
function timestamp(){
    var currentTime = new Date()
    var dat = currentTime.getDate()
    dat = ("00" + dat).substr(-2,2);
    var mth = currentTime.getMonth() + 1;
    mth = ("00" + mth).substr(-2,2);
    var hours = currentTime.getHours()
    hours = ("00" + hours).substr(-2,2);
    var minutes = currentTime.getMinutes()
    minutes = ("00" + minutes).substr(-2,2);
    var seconds = currentTime.getSeconds()
    seconds = ("00" + seconds).substr(-2,2);
    return dat+"-"+mth+"="+hours+"-"+minutes+"-"+seconds;
}
In retrospect it might have been more sensible to keep the capturing of the sites in separate scripts, this would have made it easier (at least in some ways) to deal with the next issue; how to schedule and execute the running of the capture script(s).
Captured images are 1024 pixels wide and generally 6000-8000 pixels tall. As I will explain later on, the difference in height affects how straightforward it is to do programmatic comparison of content. This factor and the fact that the bottom chunk of this type of webpage can go virtually unchanged for days, if not weeks, is leading me to think that it might be a good idea to crop all the images to a common size, say 1024 x 4000 or so.
Scheduling captures
The capture schedule is a series of ‘rolling weeks’, and for each selected day each website is captured every 20 minutes during the ‘daytime’, when most staff are around to keep the website fresh. A ‘rolling week’ is a way of getting an overview of news content without having it influenced by one particular story or issue (big stories can dominate content for a certain amount of time), or by the producers’ scheduling of certain types of content - maybe a certain website has a lot of sports coverage on Mondays for example.
For example:
| Week No. | M | T | W | T | F | S | S |
|---|---|---|---|---|---|---|---|
| 1 | x | ||||||
| 2 | x | ||||||
| 3 | x |
You get the picture…
Defining a ‘news day’
Then, for each selected day I start capturing the websites at 0800JST and run through until 1000JST the next morning, the reason for this being; we start by defining what time we are going to think of as ‘daytime’, in this case I decided it is ‘8am to 8pm’, this is pretty arbitrary so feel free to argue. Then in order to capture the ‘daytime’ activity in Japan, the UK and the US, these ties have to be translated into Japan Standard Time JST as I’m working in Japan.
| Location | JST | Daytime Local Time | Time Diff |
|---|---|---|---|
| Japan | 0800-2000 | 0800-2000 JST | nil |
| UK | 1700-0500 | 0800-2000 GMT/BST | JST -9/8 |
| USA | 2200-1000 | 0800-2000 EST | JST -14 |
This means there are three overlapping periods within which I need to do the captures, so - as it turns out - one of my ‘news days’ is actually 26 hours long…
<--- JAPAN DAY (0800-2000 JST) --->
         <--- UK DAY (1700-0500 JST) --->
              <--- US DAY (2200-1000 JST) --->
How often to capture?
My decision here was based on the practical consideration that I would only be able to process and manage a certain number of images; there is no technological reason why a capture shouldn’t have been done every 30 seconds or every minute, but this would have resulted in a final database of;
2 captures per minute x 60 mins x 12 hrs x 3 sites x 10 newsdays
= waaaay too many! (43,200)
Instead I took the attitude that while doing frequent captures might give a more fine-grained view of of how websites change, actually, most of the time they don’t change that much in a short period of time. So I decided – based on nothing more than what I felt to be common-sense – that a capture every 20 minutes would be sufficient to get a good idea of changes throughout a news day. This means a far more manageable final database and (I hope) doesn’t sacrifice too much in terms of getting a comprehensive and accurate view of changes on a site.
3 captures per hour x 12 hrs x 3 sites x 10 newsdays
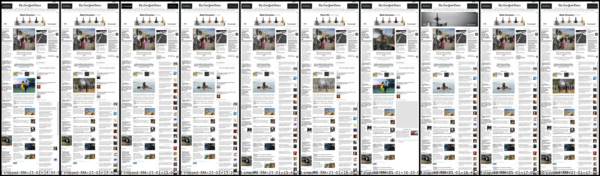
= 1080 (a nice round-ish manageable number)This gives a lot of images, pages and pages of this kind of thing…
NYT 1420-1720, 25 Jan 2017
I estimate that the database will ultimately contain around 6GB of images.
Advantages and drawbacks
I would suggest that the strengths of an approach like this outweigh the drawbacks, they are;
- The headless browser means one can capture a version of a website which is not affected by any type of ‘personalisation’, based on a user’s browser history etc.
- Capturing can be done programmatically; reliably and in a regular way (not dependent on when the researcher is awake to do the capturing!)
No methodology is without its weaknesses. These captures are a snapshot of a certain website, thus any dynamic content (crawlers, slideshows, video etc) is not reproduced accurately. Given that this type of content is becoming more common this might be a significant problem in the fairly near future, at the moment though I’m not sure it’s necessarily a deal-breaker.
Processing Images
Once the content of the image database is created we move on to the next step of actually using the images to try to answer our questions.
Before we do anything in the way of meaningful analysis though there are certain problems, well, wrinkles, which I have needed to deal with; specifically:
The Asahi Shimbun site does not seem to define a background colour for its website (on the web the background probably looks ‘white’ but this is reliant on some browser default setting), and when captured in the ‘headless’ bot-type browser that
Phantom.jscreates, the captured words and pictures show up against a transparent background. This is not a big deal but it is rather distracting and makes the captures hard to view.The top of the Guardian webpage is an advertising banner, again probably because of the nature of the ‘browser’ used to do the capturing, the contents of the banner only show up intermittently.
And (newsflash!) it seems that after 1 April 2017, the New York Times has instituted a ‘cookie confirm’ screen which (just for bot-type browsers?) effectively covers the entire page with a semi-transparent layer of white. The content is still legible but the effective contrast is greatly reduced; the black text looks pale grey, photo contrast/saturation is greatly reduced etc.
So I think I need to do three things:
- Put all the Asahi captures against a white background.
- Chop off the top of all the Guardian captures; I’m not particularly interested in the content of the advertising and the banner is always the same size and this will make it easier to compare what I really want to look at, the news content.
- Knock the contrast on the NYT images up to a reasonable level, trying to make them as similar to the pre-April images.
There are thus in the region of 1000 images that need to be processed in some way or other. One could do this by hand using Photoshop or some equivalent, but I think we all have better things to be doing with our time…
And this is where the next handy tool comes in: ImageMagick
ImageMagick(IM) is a command-line tool for image manipulation, it can do pretty much anything you might be able to do in Photoshop etc, but it can also do batch processing. Thus it can perform the same operation on, for example, all the files in a certain folder. This is an extremely handy thing to be able to do if you’re dealing with large numbers of images like I am here.
‘Fixing’ Transparency
This can be achieved with an IM command like …
convert '*.png' -background white -alpha remove '*.png'
which will take all PNG files in the folder the command is run from and replace transparency with ‘white’. Handling of filenames for output files is a bit basic and needs to be improved. It’s important that the files keep their correct names as the name contains the date and time they were created, and when managing your files it’s far easier to look at a file’s name than it is to dig through its more hidden ‘properties’.
Getting rid of that banner
This will be done using the IM chop command, something like this …
convert '*.png' -set filename:f 'trim-%f' -chop 0x125 '%[filename:f]'
which will look for all PNGs in a folder, add the word ‘trim-’ to the beginning of the filename, chop off the top 125 pixels, and save the newly trimmed file (with its new name).
Adjusting contrast/gamma
Still to start working on getting this one right, but this…
convert '*.png' -level 0%,100%,0.2 OUT.png
seems to work ok. Unfortunately there’s no way to get rid of the massive banner that blocks out the top of part of the content.

Fixed! Sort of…
I may have to try to find another way to capture the NYT, or abandon the idea of using it as part of my sample.
Comparing images
It’s also possible to do a variety of comparisons of different sorts with ImageMagick.
For instance: We can compare two sequential captures using IM’s ‘compare’ function; this looks at pixel-by-pixel differences in two images and produces output that highlights (in red) the differences it finds.
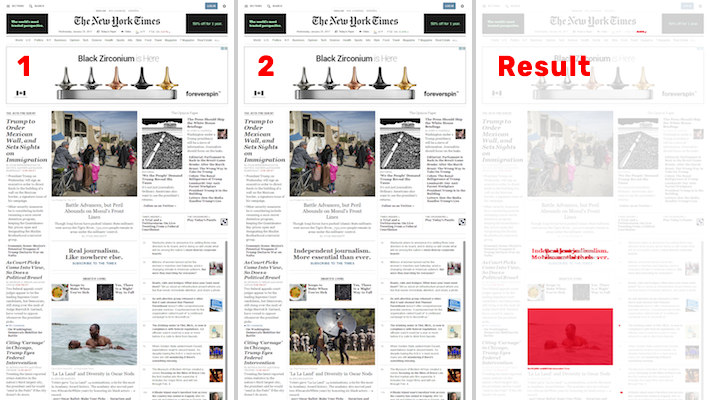
Image 1 and 2 compared …
Unfortunately, the compare function doesn’t seem to always work as expected, and in fact using Photoshop CC to compare the same two images1 can give different results. I suspect it may be useful as a guide to spotting where changes ‘may’ be taking place but that accurate and consistent analysis will have to be done by hand (and eye).
Results so far…
Analysis
This is my initial plan:
- Consider all the websites in hourly blocks, that is in terms of changes over a single hour, or 3 consecutive capture images.
- Er… that’s it.
Thinking about it, the unit of comparison shouldn’t really be ‘the pixel’, which is what the comparisons above were aiming at, it should be a unit which makes sense — i.e. actually has meaning for those who produce and consume the site — for news websites, that is, ‘the story’. And that makes the whole process a lot more reliant on my effort, which is a pity as I like to try to get my computer to do all the tedious repetitive tasks… ahh well.
To be continued…
By putting the two images in layers and changing the layer composition between them to ‘difference’.↩
NEWS · RESEARCH
blog software writing images webnews